Nvidia GPU Driver Setup: Essential Steps for AI Developers
In this AI-boom era, LLM is probably what every company talks about. Many places want LLM Solutions to play a bigger role in their company, whether it's creating Chatbots, RAG, etc. What follows is that these solutions need to be in the company's Infrastructure, whether On-premises or Cloud provider, based on the requirement that data shouldn't be sent to external LLM providers like OpenAI for processing.
Therefore, new tasks for infrastructure people like us will be to provision GPU machines. However, after getting the machine, there are still many things to configure, such as installing drivers and other tools. In this article, we'll introduce basic machine preparation methods for Infra teams to ensure GPU Instances we create are as ready to use as possible.
I'll preface by saying that the GPUs we mainly use are from Nvidia, which is one of the market leaders with the most users right now. So all content will use Nvidia as the storyteller. Ready? Let's go!!
Install Driver
Installing Nvidia GPU Driver isn't as difficult or complex as you might think. We can follow Nvidia's Document, but we need to adjust some parameters to match our chosen OS and CPU Architecture. In this article, we might not cover every topic listed in the Document, but we'll teach basic installation methods that allow GPU usage.
Nvidia driver installation document
1. Prepare Required Parameters
From the Supported Linux Distributions table, which tells us which Linux versions support Driver installation.
3 parameters we need to note for use in the next steps:
- $distro
- $arch
- $arch_ext
Suppose we use Linux Ubuntu 22.04 LTS on x86 machine. When we compare values in the table:
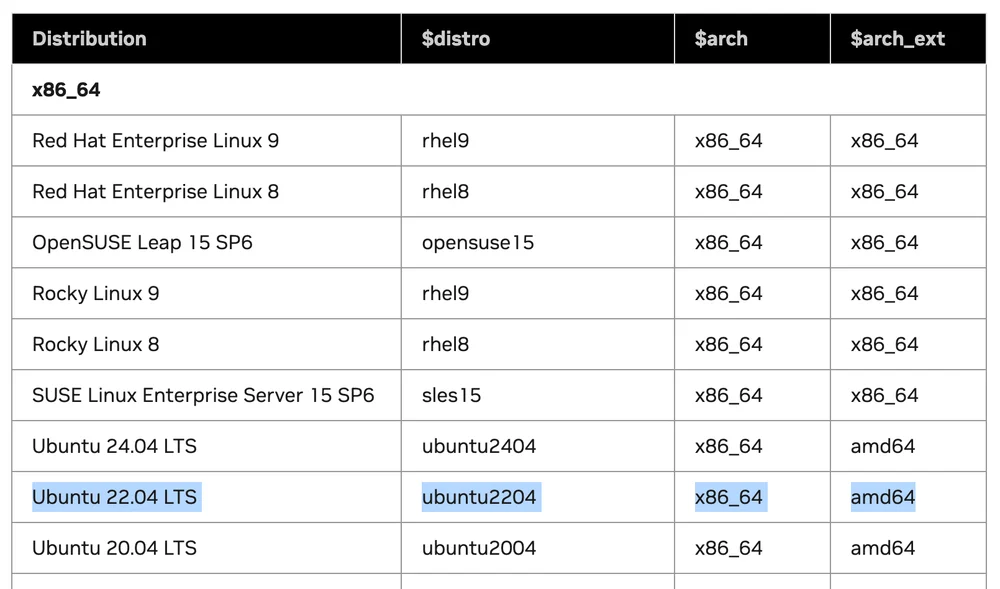
The values will be: $distro = ubuntu2204 $arch = x86_64 $arch_ext = amd64
2. Choose Installation Guide According to Linux Distribution
This step is choosing the Driver installation method according to our OS. From my example choosing Ubuntu, we'll look at section 10 which explains Ubuntu installation methods.
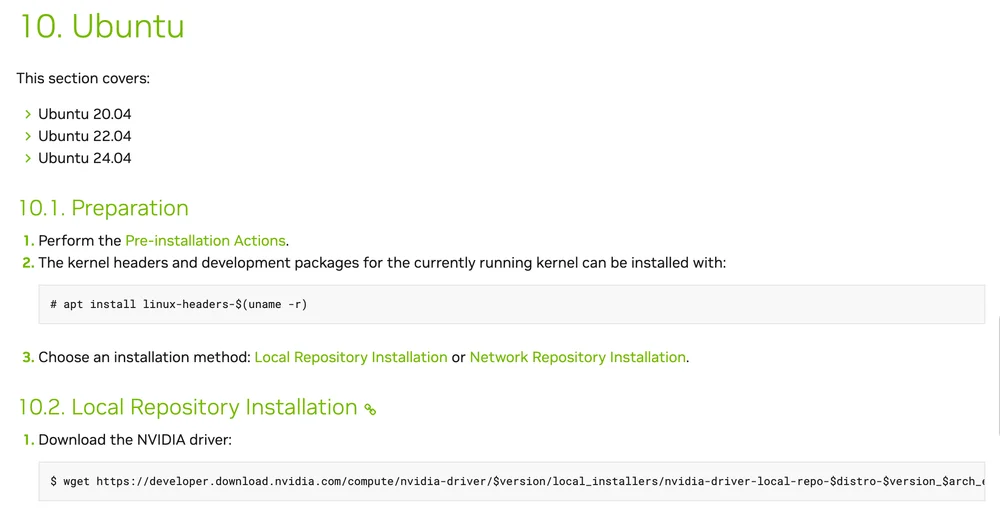
What we need to do is:
- Follow all Pre-installation steps
- Install kernel headers and development packages
sudo apt install linux-headers-$(uname -r)
- Choose installation method between Local Repository or Network Repository. I'll choose Network Repository.
In URL https://developer.download.nvidia.com/compute/cuda/repos/$distro/$arch/cuda-keyring_1.1-1_all.deb
Replace $distro and $arch with values from the table
wget https://developer.download.nvidia.com/compute/cuda/repos/ubuntu2204/x86_64/cuda-keyring_1.1-1_all.deb
sudo dpkg -i cuda-keyring_1.1-1_all.deb
sudo apt update
Install the new cuda-keyring package
- Install Driver
sudo apt install nvidia-open
After completing this step, we'll have Nvidia Driver and CUDA Library installed on our machine. We can verify with command:
nvidia-smi
The output will show the number of active GPUs along with basic utilization.

nvidia-smi output
- Install CUDA Toolkit
apt install cuda-toolkit
CUDA Toolkit Installation
That's it! We now have a Linux Ubuntu machine with GPU ready to use.
NVIDIA Container Toolkit
Simply put, it's Tools and Libraries that allow containers to use GPUs. We'll start with installing NVIDIA Container Toolkit. This example focuses on Docker containers which I believe many people use most.
From this example, we'll use Ubuntu as the installation example.
Prerequisites:
- Container engine (Docker, Containerd)
- Nvidia GPU Driver
- Configure the production repository
curl -fsSL https://nvidia.github.io/libnvidia-container/gpgkey | sudo gpg --dearmor -o /usr/share/keyrings/nvidia-container-toolkit-keyring.gpg \
  && curl -s -L https://nvidia.github.io/libnvidia-container/stable/deb/nvidia-container-toolkit.list | \
    sed 's#deb https://#deb [signed-by=/usr/share/keyrings/nvidia-container-toolkit-keyring.gpg] https://#g' | \
    sudo tee /etc/apt/sources.list.d/nvidia-container-toolkit.list
- Update the packages list from the repository
sudo apt-get update
- Install the NVIDIA Container Toolkit packages
sudo apt-get install -y nvidia-container-toolkit
From these 3 steps, we'll have nvidia container toolkit installed. The next step is configuring our container engine to use this toolkit.
Docker Configuration
sudo nvidia-ctk runtime configure --runtime=docker
sudo systemctl restart docker
For other container engines, you can check the Document for more details.
For Kubernetes, I'll make it another major topic because there's another specific Tool more suitable for K8S than installing GPU Driver and configuring toolkit on each Node.
Monitoring Tools
After installation and usage, the next thing we should do is monitor usage. The simplest initial monitoring might just use nvidia-smi to see how many GPUs there are and how much usage, but that's not detailed enough. So I'd like to recommend other Tools as usage options.
Nvitop
Interactive CLI that can view detailed GPU usage. Installation is very easy with:
pip3 install --upgrade nvitop
Then just use the command:
nvitop
And you'll get an Interactive UI displayed through terminal

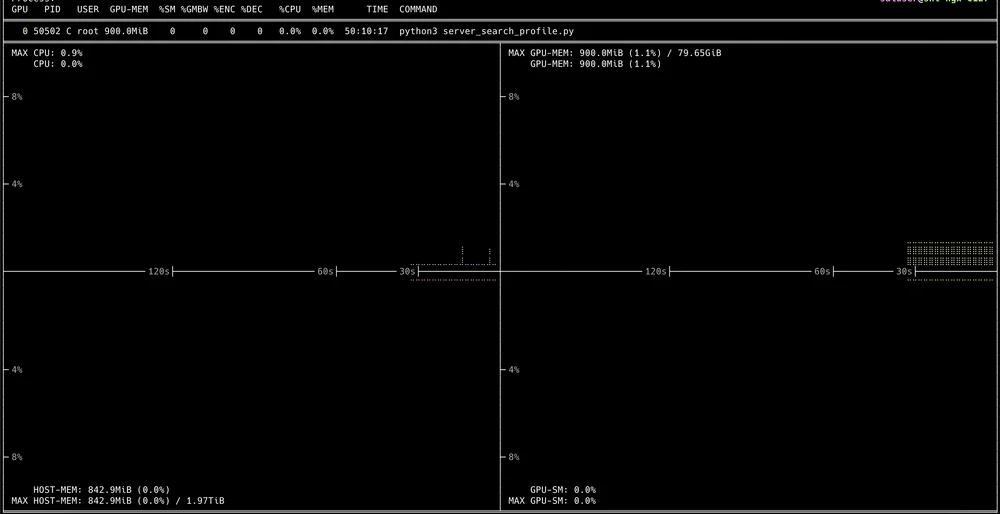
Where we can Drill-Down to view each running process.
NVIDIA DCGM
Official Tool from Nvidia developed with Golang, acting as an API for extracting various GPU Cluster metrics.
For installation on regular VMs, you need GPU Driver, Docker engine along with Nvidia Container toolkit installed first to use DCGM.
For usage methods, I'll save them to write as a separate full article because using DCGM to its fullest requires using it with several other Tools like Prometheus and Grafana Dashboard.
Final Summary
By now, I think everyone who's read to the end should be able to provision VMs with GPUs ready for team use. If we gradually understand it, I think it's easier than installing some Services. As for pending content, please keep following. It should help you build infrastructure from dev to production.